| Overview |
| IL for Reactions |
| IL for Shear |
| IL for Moment |
| Summary |
| Homework Problems |
| Report Errors or Make Suggestions |
Section IL.2
Qualitative Reaction Influence Lines
Last Revised: 02/17/2026
There are three reactions for this beam, making it useful as a starting point in the discussion.
To find the reaction at support “A”, a unit displacement is imposed at “A” and the resulting deflected shape would be sketched qualitatively. An upward displacement would denote an upward reaction force at “A”. Figure 2 shows the influence line for reaction at “A”.
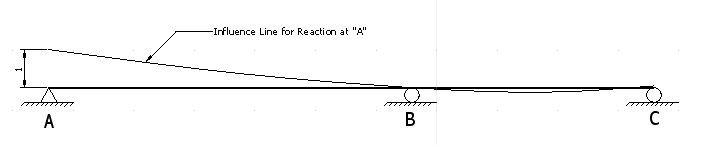
Figure 2: Influence Line for Reaction at "A"
The quantitative value of the influence line at “A” is 1.00. What this says is that if a point load is placed on the beam at point “A” the reaction at “A” due to that load would equal the magnitude of that load (value of the influence line at the location of the load times the magnitude of the load). For example, if a 5 kip point load is placed on the beam at “A”, the reaction at “A” due to that load would be 5 kips.
If the 5 kip load was moved to point “B” where the value of the influence line is zero, the reaction at “A” due to a 5 kip load at “B” would be 0*5 kips which equals zero. The same would be true if the point load were to be placed at point “C”.
As the complete quantitative influence line has not been determined, qualitatively any load placed where the influence line is positive will induce an upward (positive) reaction at “A” since the reaction at “A” due to a load being placed at some location on the span equals that load times the value of the influence line at the location where the load is placed.
For this example, if a load is placed anywhere on the left span, it will cause an upward reaction at “A”. The magnitude of that reaction will decrease the further the load is moved from point “A”. Any load placed on the right span will also cause a reaction at “A” only the reaction will be downward (negative).
If enough point loads are added to the spans they can be approximated as a distributed load. Consequently, any moveable load (such as a uniformly distributed load live load) should be placed wherever the influence line is positive to get a maximum upward reaction at “A”. This case, the load should be placed over the length of the left span. To get a maximum downward reaction at “A” due to a distributed load, that load should be placed the length of the right span.
When designing the reaction support for the beam, it is important to know what the maximum downward and upward forces are. Influence lines can be used to show where to place the moveable load to get the desired effect.
Figure 3 shows the qualitative influence lines for reactions at points “B” and “C”.
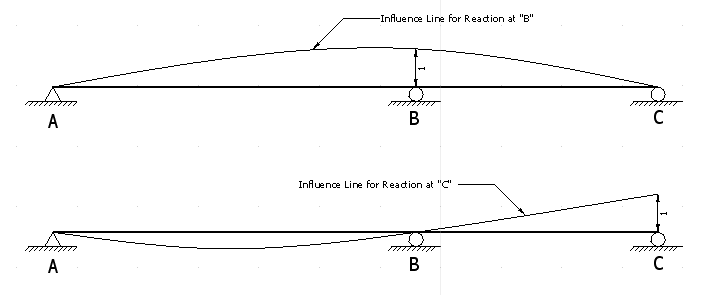
Figure 3: Influence Lines for Reaction at "B" and "C"
The influence line for reaction at “B” shows, if the movable load is a uniform load, that the load should be placed on both spans. It also shows that there is no location where load can be placed on the beam that will cause a downward reaction at “B”.
The influence line for reaction at “C” shows that an upward reaction at “C” is found by loading the right span and that loading the left span will result in a downward reaction.
Three unique load diagrams for a uniformly distributed load are derived from the influence lines, as shown in Figure 4.
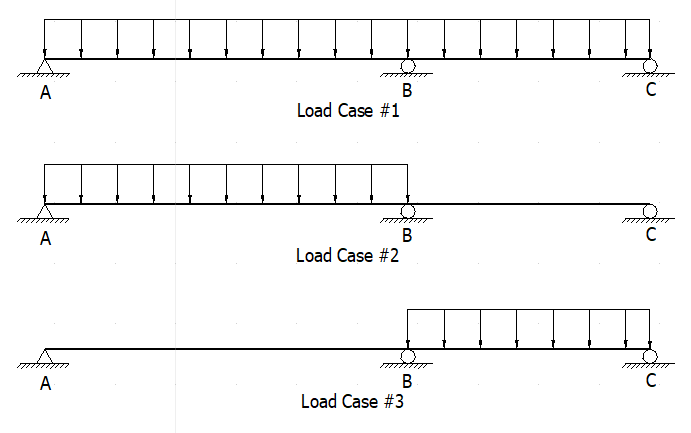
Figure 4: Unique Uniformly Distributed Load Cases for Reactions
Load Case #1 will provide the maximum upward reaction at “B”
Load Case #2 will provide the maximum upward reaction at "A” and the maximum downward reaction at "C”
Load Case #3 will provide the maximum downward reaction at "A” and the maximum upward reaction at "C”.
The reactions at each of the three points are determined using these loading diagrams with the appropriate distributed load magnitude. The resulting reactions from each load case can, due to linear elastic behavior, be combined by superposition with reactions due to other non-movable loads on the span to arrive at the total reaction at each point.